Easypano Panoweaver 8 Pro
Panoweaver 8 Pro is an automatic panorama stitching software with extensive support for fisheye lenses by Easypano. It can stitch large multi-row panoramas up to full spherical virtual environments. Plus, it has sophisticated masking tools for erasing the tripod and other unwanted elements from panoramic images.Panoweaver 8 Procan create standard panoramic images for printing or for electronic use. This software includes built-in capabilities to publish interactive panoramas in five different formats: Flash, Java, Quicktime VR, Shockwave and HTML 5. Version 8 adds an auto-switching publication method that shows an immersive panorama as HTML 5 on iOS devices and as Flash otherwise. Interactive output is highly customizable with background music, context menus and user-defined toolbars. There are two formats for embedding panoramas directly on a website: Java Applet and Flash VR, plus an HTML 5 option for sharing with Apple mobile products.
Panoweaver is available for Windows and Macs in three editions: Pro, Batch and Standard. The Pro version is the one tested in this review. The Batch version adds the capability to automate the creation, publication and conversion of panoramas but omits some newer functions. The Standard version only supports rectilinear lenses and 24-bit images and lacks some options to customize publication.
Version 8 adds a popular Wee Planet projection which can be output as an image, Flash or stand-alone Shockwave file. The rendering and stitching engine has been significantly overhauled in this version to improve feature matching and stitching accuracy.
User Experience
Starting Panoweaver 8 Pro brings up the application's single interface window with a fixed toolbar and a contextual side-column made of collapsible sections for fine-tuning panoramas. The toolbar shows commonly executed functions while the menu duplicates them and adds a few more. There is no real way to get lost in this application but a little time is needed to get familiar with the icons.Images are selected using the New Project button and appear in the main window under source images after that. The three icons which appear below the tab give access to different views of source images. The last one of these brings up the control-point view which allows for manual, instead of automatic, stitching.
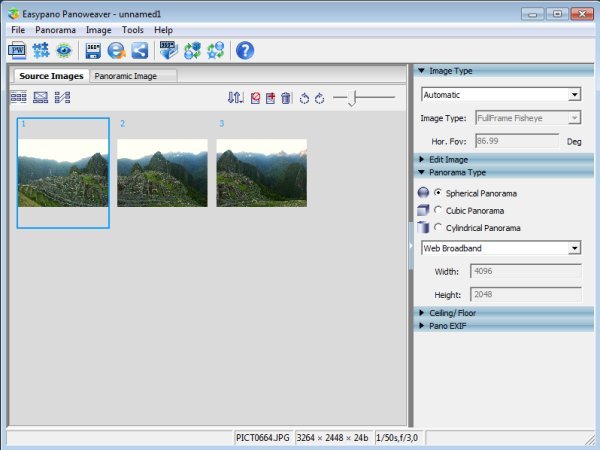
There are three available panoramic projections: Spherical, Cubic and Cylindrical. Note the absence of Rectilinear. Cubic, the least common option, creates a panorama made of up to 6 images representing the sides of a cube onto which the panorama is projected. This enables the Tripod-Removal function, allowing users to mask a region of the bottom face of the cube. Neatly, one can create a Spherical panorama, convert it to Cubic, remove the tripod and convert it back to Spherical if so desired.
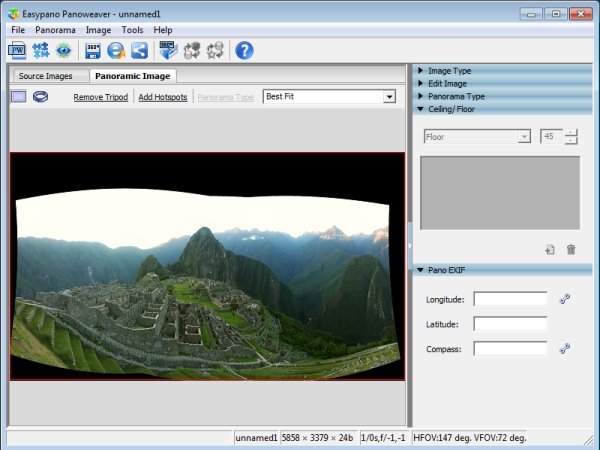
The Panoramic Image tab is where the resulting panorama can be seen. It remains empty until something has been stitched. There are two views within that tab, one shows the entire panorama as a flat image and is used to set crop boundaries. The second view shows the panorama in a virtual environment using OpenGL. This is called the Immersive view and renders the panorama with a natural perspective. It lets the user navigate the environment. Gestures there are reversed compared to panning since the pointer represents the viewing direction. Hence, moving the viewpoint upwards makes the panorama move downwards.
Output Quality & Performance
The Pro version of Panoweaver 8 has two blending engines, the standard one and the Strong one. Both are good in terms of output quality but the Strong one is noticeably better, producing crisper results with less variation in sharpness across seams. The spherical projection seems to produce better results than cylindrical and preserves a wider vertical field-of-view while cylindrical truncates a little too much at the base.Automatic stitching had no problem with the standard 3-image single-row panorama used in our software reviews. Recall that this was not the case for version 7, so a dramatic improvement. Panoweaver Pro 8 even handled larger panoramas without crashing but showed more stitching errors than expected. Adding control points manually improved things considerably but spherical panoramas taken with a rectilinear lens never rendered perfectly.
Panoweaver is advertised as being capable of stitching HDR panoramas. Unlike most software boasting this, Panoweaver does it via a stand-alone tool which automatically merges exposure-brackets into HDR images. This tool works reasonably well but offers no control over how the results are tone-mapped. The resulting HDR3 Formats available: OpenEXR, Radiance HDR and Floating-Point TIFF. or tone-mapped4 Formats available: JPG, PNG, TIFF, BMP. images are then supposedOddly, Panoweaver was unable to open the TIFF files which it produced. They were readable from other software though. to be stitched together using the main piece of software.
The performance of Panoweaver is very good using the standard stitching method. For a single 3-image single-row panorama using a cylindrical projection, it took 31 seconds. This puts it in second place, just behind MS ICE which took 28s. The Strong method is extremely slow though, taking a whopping 181s with visible improvement in final output quality, particularly in terms of sharpness and details around seems.
Note that there is no way to adjust the horizon and vanishing point of panoramas. Finally, although an HDR panorama could not be created, the included stand-alone HDR Merge Tool produces good quality images with a surprisingly natural tone-mapping.
Conclusion
Panoweaver 8 Pro is a capable panorama stitching software with advanced publication capabilities. Version 8 greatly improved upon its predecessor and manages to stitch typical panoramas. The output quality is good without visible seems showing as long as features are aligned perfectly. In case automatic stitching fails, Panoweaver lets user manually set control-point and position them reasonably precisely.The newly added Wee-Planet projection is sure to make some people happy too and using it is as simple as can be. In terms of panorama assembly, the feature set is rather basic but Panoweaver compensates for that with detailed control over publication of panoramas in five versatile formats. The Pro version can also publish directly to Facebook.
Source: http://www.neopanoramic.com/review/panoweaver#.UHaLHVqhDgg.facebook
没有评论:
发表评论